Introduction
Ever worked on a group project where multiple people edit the same document? Without a structured approach, chaos ensues—overwriting each other’s work, confusion about the latest version, and plenty of frustration. GitHub solves this problem using branches, allowing developers to work on different features simultaneously without disrupting the main project.
Branches give you a safe space to experiment. Once your changes are ready, merging brings everything together. In this guide, we’ll break down how branches work, how to merge changes, and how to handle conflicts like a pro.
What is a Branch in GitHub?
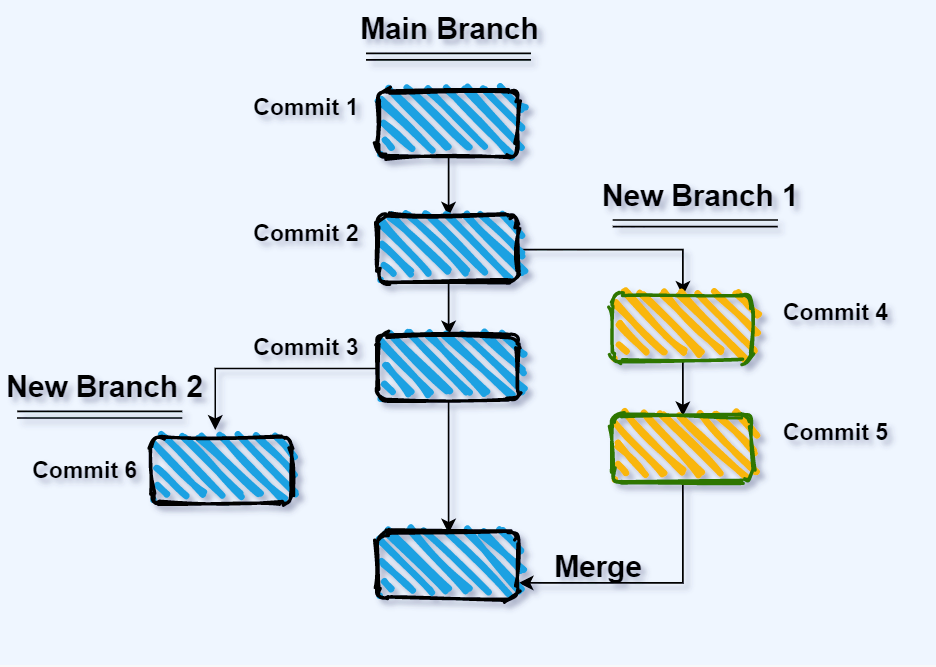
Think of a branch as a parallel universe where you can make changes without affecting the main project. When you’re happy with the results, you can merge your branch back into the main codebase.
Why Use Branches?
✅ Work on new features without disturbing the main project
✅ Collaborate seamlessly with others
✅ Experiment freely—rollback if things go wrong
✅ Keep track of different versions
Every Git repository starts with a single branch called main (or master). Instead of making changes directly to main, developers create separate branches, work on them, and later merge them back.
Creating and Switching Branches
1️⃣ Creating a New Branch
To create a new branch in GitHub, run:
git branch feature-branchThis creates a branch called feature-branch but doesn’t switch to it.
2️⃣ Switching to Your New Branch
Use:
git checkout feature-branch  # Old method
git switch feature-branch    # Recommended method
Now, any changes you make will be inside feature-branch.
🔗 Related Guide: GitHub Docs on Branching
Merging: Bringing Changes Together
Once you’re happy with your work, it’s time to merge your branch back into the main project.
1️⃣ Switching Back to main
git switch main2️⃣ Merging Your Feature Branch
git merge feature-branchIf there are no conflicts, Git will smoothly integrate your changes.
Handling Merge Conflicts
Sometimes, Git can’t automatically merge changes, especially if two people edited the same file in different ways. That’s called a merge conflict.
1️⃣ Git Warns You About a Conflict
If a conflict occurs, Git will show something like this:
Auto-merging index.html
CONFLICT (content): Merge conflict in index.html
2️⃣ Resolving the Conflict
Open the conflicted file, and you’ll see Git’s markings:
<<<<<< HEAD  # Changes from main branch
<p>Old content</p>
======
<p>New content from feature-branch</p>
>>>>>> feature-branch
Decide which version to keep (or combine them), then save the file.
3️⃣ Mark the Conflict as Resolved
git add index.html # Mark resolved4️⃣ Complete the Merge
git commit -m "Resolved merge conflict in index.html"Now your changes are safely merged!
🔗 Troubleshooting Guide: How to Resolve Merge Conflicts
Best Practices for Branching & Merging
✔️ Use meaningful branch names (e.g., fix-login-bug instead of new-branch)
✔️ Pull the latest changes before merging (git pull origin main)
✔️ Commit small, logical changes frequently
✔️ Write clear commit messages explaining why the change was made
✔️ Use Pull Requests (PRs) instead of merging directly to main
🔗 Learn More: Pull Requests & Code Review
Conclusion
Branching and merging are the foundation of smooth collaboration in GitHub. Whether you’re working solo or on a team, mastering these concepts will prevent messy code and improve productivity.
Ready to enhance your collaboration skills? Check out this detailed tutorial on Git Branching and Merging, where the process of branching and merging in Git is thoroughly explained, including how to use these features with GitHub in the feature branch workflow. Happy coding! 🚀
Git Branching and Merging – Detailed Tutorial
💬 Have questions or feedback? Drop a comment below! 🚀
Leave a Reply